Showing posts with label Crafting. Show all posts

Friday, June 17, 2016

Tie Dye

Ryan and I have a ton of music festivals coming up and we wanted to make our ezup look cool not boring and lame. So, we dyed our ezup sides. As you can see above they turned out amazing.

What you need~
Rubber bands
Dye (We used Deco Art Jacquard Procion Mx Dye, 2/3-Ounce, Bright Green, Fire Engine Red and Turquoise.)
Fabric to dye (We had two large fabric sides and two t-shirts)
Soda ash (1 pound)
Jacquard Urea 1lb Pkg For Batiking
New Star 26115 Plastic Squeeze Bottle, 8-Ounce, Clear, Set of 6  
Gloves
5 gallon bucket
Tarp
Water hose

I am not recreating the wheel here this is a tried and true process and there are many amazing tutorials out there. We roughly followed this method at Best Dye .

Here is some pictures of our work.


 Here are all the supplies we needed. No gloves, tarp or buckets pictured.
Giant bag of rubber bands!


We soaked the fabric in the soda ash for at least 15 minutes. Highly recommend doing this on a tarp it can get a little messy.Twist out as much water as possible.


Make a fancy shape and put a ton of rubber bands around your little ball of fabric. Ryan did a really cool twisted technique.


Mix up your dyes. We had the tiny bottles but honestly thought we needed more so we used some old bottles in the recycling to make larger batches of dye. We sadly did not get to drink that margarita mix while doing this.


Starting the process of dying. Dose it really good as the more you have soak in the more bright the colors will stay.


Looking good.


Work in progress. I am sure Ryan could go for a margarita at this point. To bad that is dye and not mix!


All ready to sit in a bag for 24 hours. We put them each in their own garbage bag and they hung out in the garage for that time.


The next day we rinsed them on the tarp outside till they ran clear with the cold hose water. I forgot to take pictures of that process. Sorry!

We then put them in the washer machine for the hot cycle and ran the dryer.
DISCLAIMER: Run your washing machine through another cycle after doing this so that you make sure all dye is out of the machine before washing normal clothes.

Here they are hanging to dry more.

How cool does that look? We did have some slight shrinkage on the sides due to drying but Ryan used clamps for the sides and they held up really nice. Cannot wait to bust this out at Electric Forest and Rock USA!

Until next time~
XoXo Emily


Monday, March 14, 2016

Tree/Elephant Mural

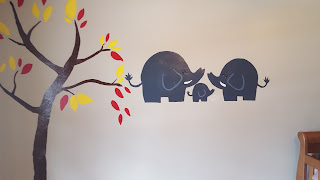
Yesterday I spent some time painting a mural for a friend's nursery. My mom painted the cute little elephants and I painted the tree. I think it really turned out good. As you know I have a love of painting so it was a nice way to spend the afternoon.

Word to the wise, don't use oil based paint it is a pain in the butt to clean up!


Mom doing some final touches.


It took us about 3-ish hours and we were lucky to have all the paint already so it cost us nothing to do this besides our time. It really turned out fantastic and we cannot wait to see it when the babies room is all done.

Until next time~
XoXo Emily

Thursday, October 29, 2015

Painting Pumpkins

I hate pumpkins guts. Due to this I have a love hate relationship with carving pumpkins. This year for my Halloween party instead of carving pumpkins we are doing a caramel apple bar. More on that on a later post.  (Anyway back to the pumpkins). Since we are not doing them at the party I can do whatever I want this year. I decided I wanted to paint my pumpkin. It is of course less messy and I do not have to get my arms and hands full of goop.

What you will need to do this project:
A pumpkin
Acrylic paints ( teal, white, black, red, green)
Paint brushes (I used two large and three small brushes)
A paper plate to put your paints on
Paper towel
A glass of water (I have an actual tray to clean my brushes in if you are not that fancy this works fine)
Paper bag 

First you want to clean off that pumpkin really good they can be muddy. The back of my MINI Cooper knows this all to well. It was raining and I may have thrown dirty pumpkins on the leather seats. Whoops.

Once clean set up your work station. As you can see in some of my pictures my work station is constantly an organized mess. I do a lot of projects so it is organized chaos at all times. I always have a ripped paper bag laid down when painting so I do not get my gorgeous butcher block desk all full of paint. Ryan (the hubby) would die if I let that happen.

Make sure you have all the brushes you think you will need to start. No one wants to be digging around with paint on their hands.

I painted his nose first as I knew teal would require more than one coat of paint. I then moved on to paint the white in the eyes. I thought it would be fun to have one large eye and one small one. After that was done I painted the teeth for the pumpkin. Look at those buck teeth!

 Painting the cheeks red was a fun step and challenging because it is hard to paint a circle on a round pumpkin.

I then moved onto painting the black in the mouth. This is where you want to make sure you wipe your brush off if you get any white on it. Use that paper towel for this!

Once this was completed I could start to go in and do the fine details like outlining the mouth, eyes, nose and cheeks. I also decided to draw on some crazy eye brows.


Notice the paint all over my paper bag? Protecting your working surface is so important.

The very last thing I did was add the green eyes to my funny pumpkin and the white to the cheeks.

For my very first painted pumpkin I think he turned out fantastic. What are you doing this year are you carving or painting? I hope this helped you see there are other options than carving out there.

Until next time~
XoXo Emily

Tuesday, October 20, 2015

DYI Stained Glass Windows

Sometimes you take on projects without realizing how they will be extremely time consuming. I wanted privacy in my room that I turned into a closet. This room faces the road so if you are getting changed and things you want privacy. I went on the internet and bought a magical product called Gallery Glass. As you can see in the above picture all the work I had to do was totally worth it in the end. I may have had a sore back and tired hands after 3 hours of doing this though.

Things you will need-
Windex
Gallery Glass (1.5 bottles per window)
Paper towel
Scissors
Knife
Putty scraper
Ladder
Tooth pick 
Drop cloth (not shown)


The main reason I wanted to do this project was to get rid of this gross white film we were forced to use. This film does the function of privacy well but it is ugly. From the road it completely whited out my windows. This was problematic because the rest of my windows on the front of my house were clear. Therefore, I had mismatched windows and it drove me crazy for about 2 years.

The first step was removing this white film. It took me a half hour and a lot of strength to remove this film. Make sure you have your drop cloth all set up under you ladder. Once removed you want to work on cleaning the windows and scrapping off any left over glue remaining from the film. I used the knife to start the process of peeling the film and the putty scraper to removed the left over glue. To remove stuck on glue I sprayed the window with Windex and scraped away the glue.

Now you will want to start applying the gallery glass to the windows. It looks and smells like glue. Do not freak out that it applies white and it will dry clear in about 8 hours. I applied it to the windows in a swirl pattern. As I went I would go back through and pop any bubbles that formed. I used the tooth pick to do this. As I was popping bubbles I would also add small circle patterns to the gallery glass using the tooth pick. This left my final product with a ton of awesome texture. If your gallery glass starts to run (as seen in the picture) it is okay. This product is easily removed with a paper towel piece if you get some on the frame of the window. You also should have a drop cloth or something on the floor in case you get some stray drips. In all it was not a messy project. The process of adding the gallery glass took me almost 3 hours with a break for lunch. I did take some tiny breaks because my mom came over to watch me work on this.

This is the finished product!
I have to do 3 more windows in this room. We also bought some really nice sheer window treatments to go over the windows. This way we have our privacy but still have natural light coming though. Overall I am rather happy about the outcome and now my windows will all be one uniform color from the road. Hope to do the rest of the windows soon.

Until next time~
XoXo Emily 

UPDATE: Finished the four windows with my hubby last night. I am so glad to be done with this project. The windows look fantastic but boy was it a ton of work. I would say this project took me 7 hours with 2 hours of help with my husband. Therefore, 9 hours in labor. I owe that man some cookies! 

Wednesday, October 14, 2015

Making the perfect bar cart.

Today we are going to talk about booze. 

Last year my husband (Ryan) and I decided we needed to have our things to make drinks upstairs where we host our parties. We had a full bar in the basement but it did not make sense for people to go into our basement to make a mixed drink and then have to come upstairs again. What is a girl to do to fix this you ask? I have a wonderful family and my mother supplied the cart minus the glass that was in it originally as that had long ago broke. My father in law makes butcher blocks and he made me two custom pieces to fit perfectly in the cart. We then proceeded to stain them in the bathroom since it was winter and I swear I almost died from the fumes. I also hand painted the cart itself and wheels because the cart was chipped/aged from sitting outside on my mom's porch for years. I think the cart itself turned out fantastic. 

But onto the booze!

Now that I had this amazing cart I had to stock it with everything you need to make some excellent drinks. 

 Here is what you need for staples-
Vodka- Smirnoff is a good option that is not crazy expensive. 
Southern Comfort- I use this to make my old fashions and add to hot drinks like cider. 
Gin- You need a good quality gin do not skimp and get the cheap stuff. Tanqueray is my favorite and I can buy a giant jug (seen here) at Sams Club for a decent price.
Whiskey- Our whiskey in this picture is wearing a packer cheese head. Can you tell we live in the land of green and gold? People will drink this on the rocks or with coke a lot of the time. We have a bottle of Kessler's currently. 
Brandy- I have a bottle of honey that I add to punch. 
Rum- This is a staple for people to mix with coke. 
Things not shown that you should think about having-
Tequila- People love this with juice or for shots. I am not a big fan so I do not regularly have it. 
Bourbon- Did you know this goes fantastic on ice cream? 

 Utensils that you will need-
Shot glasses- You may think you can make the perfect drink without it but some people need these to measure. (cough cough) me.
Shaker- My shaker works double time to hold all my mixing spoons when not in use. If you want a solid martini you need a good shaker. I have a great one that allows you to measure based on the drink you are making and has a built in strainer. 
Straws- I found this little gem of a straw holder at an antique show. 
Mixing spoons and stir rods- As you can see I have a bunch that I have accumulated. I know it is October but my snowmen get used year round. 
Ice bucket- To hold ice. I am not a fan of people digging in my freezer to get ice. I have an ice maker but it is in my freezer which is silly I know. I found this bucket in the same place I got the straw holder. What a steal! 
Wine opener- I have a great electric opener I received as a wine gift. I try to hide it in the corner of the cart because it is boring looking.

 This is an image of my bottle opener and an old school shot measure stick (I am not sure if that is the technical term for that item but I will call it that anyway).
 This is a good image of the total cart. Why is there a sugar bowl you ask? That is for the most delicious old fashions of course. Plus it looks cute on the cart. 
Storage is important on a cart and you want to use the space wisely. The bottom of the cart houses the glasses we use the least. The majority of our glasses are in the kitchen. As you can see margarita glasses take up a ton of space.

I hope if you take the time to make your own bar cart or bar in general this will be helpful to you. 

XoXo Emily