Tuesday, May 31, 2016

House Painting: Volume 3


This is it! We finally finished painting the house. 
Upwards of 40 hours later and it is finally all painted. We had to wait till Monday to paint due to the rainy weekend. Monday took us roughly 7 hours to do the front of the house. This does not include the hour of clean up and installing the lights on the house.

Man it was an ugly boring brown. This picture makes me sad. NOT. Glad we painted it. 


Mixing the paint. All together we used about 5 gallons I would say. We bought more to be safe and have 1.5 gallons left. Which is fine we may need some for touch ups and when we move a window later in a bathroom renovation project we have down the road. We decided to buy all new brushes, roller heads and cups when we were done with 3/4 of the house. This way all of our equipment was fresh and the highest quality. Last time Ryan wore gloves and I wised up and did the same this time. I would recommend you do the same of you have to ever paint your house. This time we mostly used a 2inch and 2.5 inch brush. The 2 inch I used a lot it was angled and worked well for trim work. The large rollers where used for painting as well. This time we had to use drop cloths to protect the brick work and cement.


 I took pictures as we went along. This is after I got the garage section done. I had to do this all by hand (brush) as the rollers would not fit in that area. Super time consuming but it was worth it. At this time of the day the house was shaded by our trees. I would miss this later in the day.


At this point I was wishing I had fireworks or something to light off when Ryan got to the last brush strokes on the house. We were giddy with excitement.


Here she is all done. This is before we cleaned up all of our mess from painting.


 MAN, it looks fantastic. The final look was well worth all the blood (yes I pinched myself in a roller and have a blood blister) sweat and tears.

Special shout out to my husband for not killing me in this process. House renovations are ruff y'all.

We decided to put a second coat on the side of the house because we had extra paint and some spots looked like they needed it.


BONUS POST: We also got new lights for the house. Ryan wanted LED/motion/fancy dimmer ones and we found them at Menards. We did have to go to all three stores in the city though because not one of them had the 5 we needed. Pictures below. Look how awesome they look with the siding. Fits my rustic/metal design aesthetic perfectly. So happy, onto the next project. 


I forgot to mention I also painted my door trim and window trim on Sunday during the day. Turned out great too. Looks awesome with the lights!  

I am over the moon happy with how this all turned out. Now onto figuring out the deck and fence this year. House projects are never ending.

Until next time~
XoXo Emily

Thursday, May 26, 2016

Skillet Curry (Chicken Tikka Masala)

I have a love affair with Indian food. I actually love cooking it more than eating it I would have to say. There is something about building flavors with sweet/spicy that is a challenge I enjoy. One of my favorite ways to do curry is in the crockpot with a ton of veggies. This variation if you will happened because I needed a quick dinner and had to use what I had in the fridge and pantry. This was like an episode of chopped (chicken tikka masala edition). It really turned out great and had enough for lunch today.

What you will need~                      
2 chicken breasts
Can of coconut cream
1 tablespoon of curry paste
2 tablespoons of garlic minced
1 large onion diced
2 cups of tomatoes diced
1 cup of tomato juice
1 tablespoon of peanut butter
2 tablespoons of hot sauce
Curry powder to taste
Gram masala to taste
Ground turmeric to taste (if you have it you can omit as needed)
Olive oil 


Heat up some olive oil and sweat you onions for about 2-5 minutes until they just become soft (on medium high) heat. While this is going on blend up your tomatoes in the food processor. I only had left over grape tomatoes from a pasta salad I made last week. They worked great.


Time to add the curry paste, curry powder, gram masala and garlic. Let it toast up for about 2 minutes or so. The key is to smell it. When the paste and spices start to smell yummy it is time to add the tomatoes.


At this point it will be hard not to eat it. It will smell delightful. You want to let the tomatoes cook for about 3 minutes before adding the coconut milk and tomato juice. When you add the coconut milk turn the heat down to simmer (low). While this is simmering cut up your chicken breasts into chunks. I should have cut them smaller they were rather large (sorry Ryan).

Cover the curry once the chicken is added and simmer it down for at least 15-20 minutes. At this point when I first learned about this dish the coconut milk would break and I would freak out. After much research I learned that in Indian cooking you want this to happen and it is normal. So, if it looks a little greasy on top that is good!


This is what it looks like after being poured over some red lentils I also cooked up. It was soooo good. I usually make mine really spicy but this time it was mellow. Which is perfect when it is hot outside as of late. You could eat this over rice too.

Until next time~
XoXo Emily


Tuesday, May 24, 2016

House Painting: Volume 2


Saturday Ryan and I painting 3/4 of the house in about 11 hours. It was grueling and honestly one of the toughest things we have done in a while. I swear I cannot curl my left hand in a fist and it is Tuesday. As you can see in the pictures it was totally worth all the hard work. We had a Facebook poll and the two color choices were #1: Red Farmhouse and #2: Double Decker. The poll voting was fierce but in the end we sided with #1.We have brown trim and the darker red color of #1 played off well with that.


This is what our housed looked like after 30 years of neglect. The people that owned the home before us were strange to put it nicely. They did home renovations such as the kitchen that looked great but then never kept up keep on other parts of the home. The siding was a big issue and for a long time we did not know what to do with it either. After much research painting it was the best option for us. Friday we bought our paint and paint supplies and Saturday was go time.
We bought 5 gallons of paint and we may still need a little more to finish the front of the house. Once we use it all and are finish I will give you the final paint totals. So far we used 4 gallons on 3/4 of house. We also bought 2 large paint rollers (one with a fancy extension options) 1 small roller and paint brushes. I used a 2 inch, 3 inch and a 4 inch brush for trim work around windows. The best purchase we made was small hand held cups that had a magnet strip for your brush to stick to. Well worth the $3 price tag. For ladders we had a large ladder seen in the top picture, a standard ladder and a foot stool to do the work on the higher parts of the house.

 We decided to start painting the very back of the house first to make sure that we got our technique down by the time we got to the front of the house. I may have messed up right away and painted part of the soffit. Ryan was not happy and proceeded to make fun of me the rest of the day. This taught us to keep wet rags around to whip up mistakes on things that should not have paint on them. IE: electrical boxes and windows. On the back of the house we did use drop clothes to protect our patio. Sides of the house I could care less if the grass and dirt got paint on them.
One half of one side is almost finished here. The back of the house took us six hours to complete having to work around windows, power boxes and the deck.


 This side is all done looks great. When this was finished and we looked at it we knew we picked the right color.


 Other side by the deck finished! At this point my neighbors started coming over or shouting that they liked the color. I feel like some of them made up yard work to watch us all day. One of my neighbors was raking rocks in his yard.


 Let's talk a little about our time consuming painting technique. This is the side of the  house facing the road. With the painting we started with painting under each siding piece to get the underside where the rollers could not reach. We also painted around all windows and trim pieces by hand with brushes. This was a lot of time consuming work but was vital to the final long lasting work and look. Pictured here is Ryan hard at work.


Here is another picture of around the windows and some of the undersides painted by hand. You can see my favorite little red hand cup as mentioned above on the ground by my step ladder. This side of the house was what I like to call "thirsty". It soaked up the most paint versus the other sides of the house. The wood was rather dry and since it gets the most sun was really bleached.


Pictured above is the finished sides after 11 hours of painting. We were exhausted but really happy with the outcome. We have to still caulk the front of the house and paint it this week if the weather works with us. Not exactly looking promising for during the week. Hopefully this weekend. I also need to work on buying new lights for the front of the house and house numbers. I cannot wait for this project to be completed.

Until next time~
XoXo Emily


Wednesday, May 18, 2016

Peanut Butter Chocolate/Butterscotch Chip Cookies


This recipe title maybe a mouthful but it is tasty. The mix of the peanut butter in the batter and the chocolate chips/butterscotch chips is heavenly. I made these on a whim as Ryan asked for cookies but I really did not have much idea what to make. I was getting the batter together for the peanut butter cookies and thought "why not throw in some chips?" I had half a bag of chocolate and butterscotch so they all went in. Turned out really good I must say so myself.

What you need~
1 cup butter
1 cup granulated sugar
1 cup packed brown sugar
1 cup peanut butter
2 eggs
2.5 cups all-purpose flour
2 teaspoons baking soda
.5 teaspoon salt
.5 bag of chocolate chips
.5 bag of butterscotch chips


Pre-heat your oven to 350 degrees Fahrenheit.
 Cream your butter. Add your sugar and peanut butter to mix. Then blend well.

Beat in eggs and dry ingredients.


Mix in the chocolate chips and butterscotch chips well. At this point if you just eat all the dough I would  not judge you.


Prep all your cookie sheets with parchment paper and refrain from cutting your finger like I did. I was lucky all my dough was made and I managed to get all the dough on the plans one handed.

Place the dough on the sheets in tablespoon size drops of  cookie dough.


Bake each tray for 10-15 minutes. I have double ovens that cook at different rates so I highly recommend just keeping an eye on them for them to be done.


They are one of my favorite cookies now. I may not be able to go back to plain old chocolate chip cookies anytime soon. This makes a lot of cookies maybe 5-6 dozen. Do not last long in our house with a cookie monster husband.

Until next time~
XoXo Emily


Monday, May 16, 2016

House Painting: Volume 1


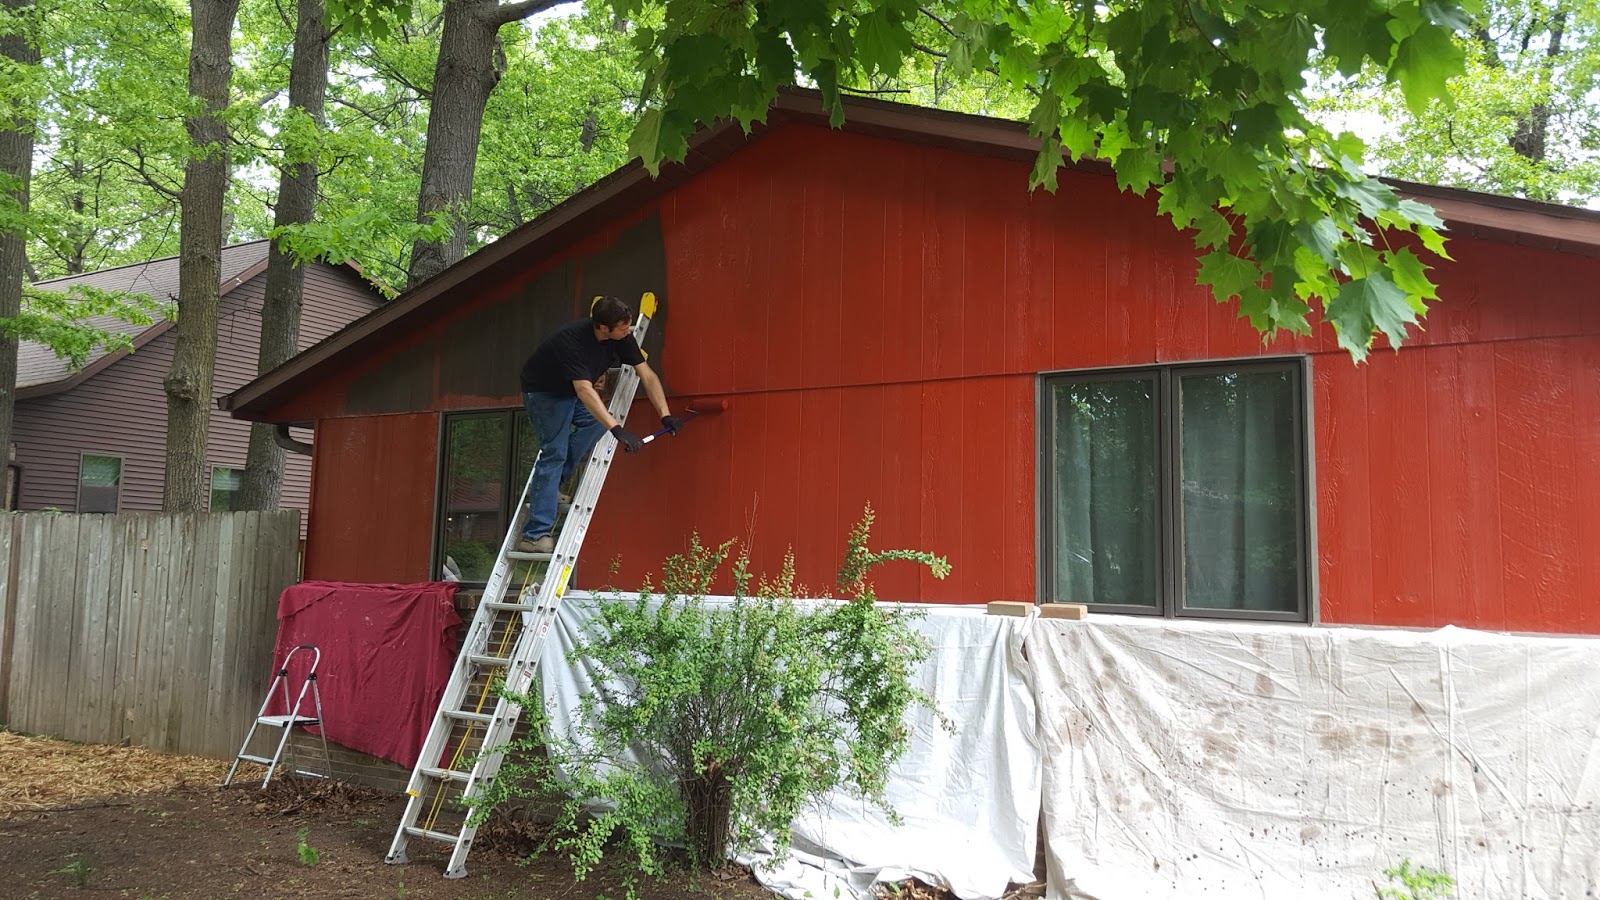
We are brave. We may also be crazy.
We knew when we bought our house it needed something done with the siding. I am slightly ashamed it took us 3 almost 4 years to do something with it.  Now I am rather excited because we got some estimates and settled on DIY painting the house. We got estimates to replace our wood siding with vinyl and those were around $10,000-$15,000. Yes, you read those numbers right and yes I also had a mild heart attack when I was told this. We knew that this was not something we could afford without selling multiple kidneys. So, we started looking at other options and the one that worked best for us was removing any wood panels that were old and rotted and painting the house. The project went from $10,000 plus to $500-$800 max. DO not get me wrong it is going to be rather time consuming as well but we like a challenge.

The first step or volume shall we call it will focus on replacing the siding and picking paint colors.

Siding-
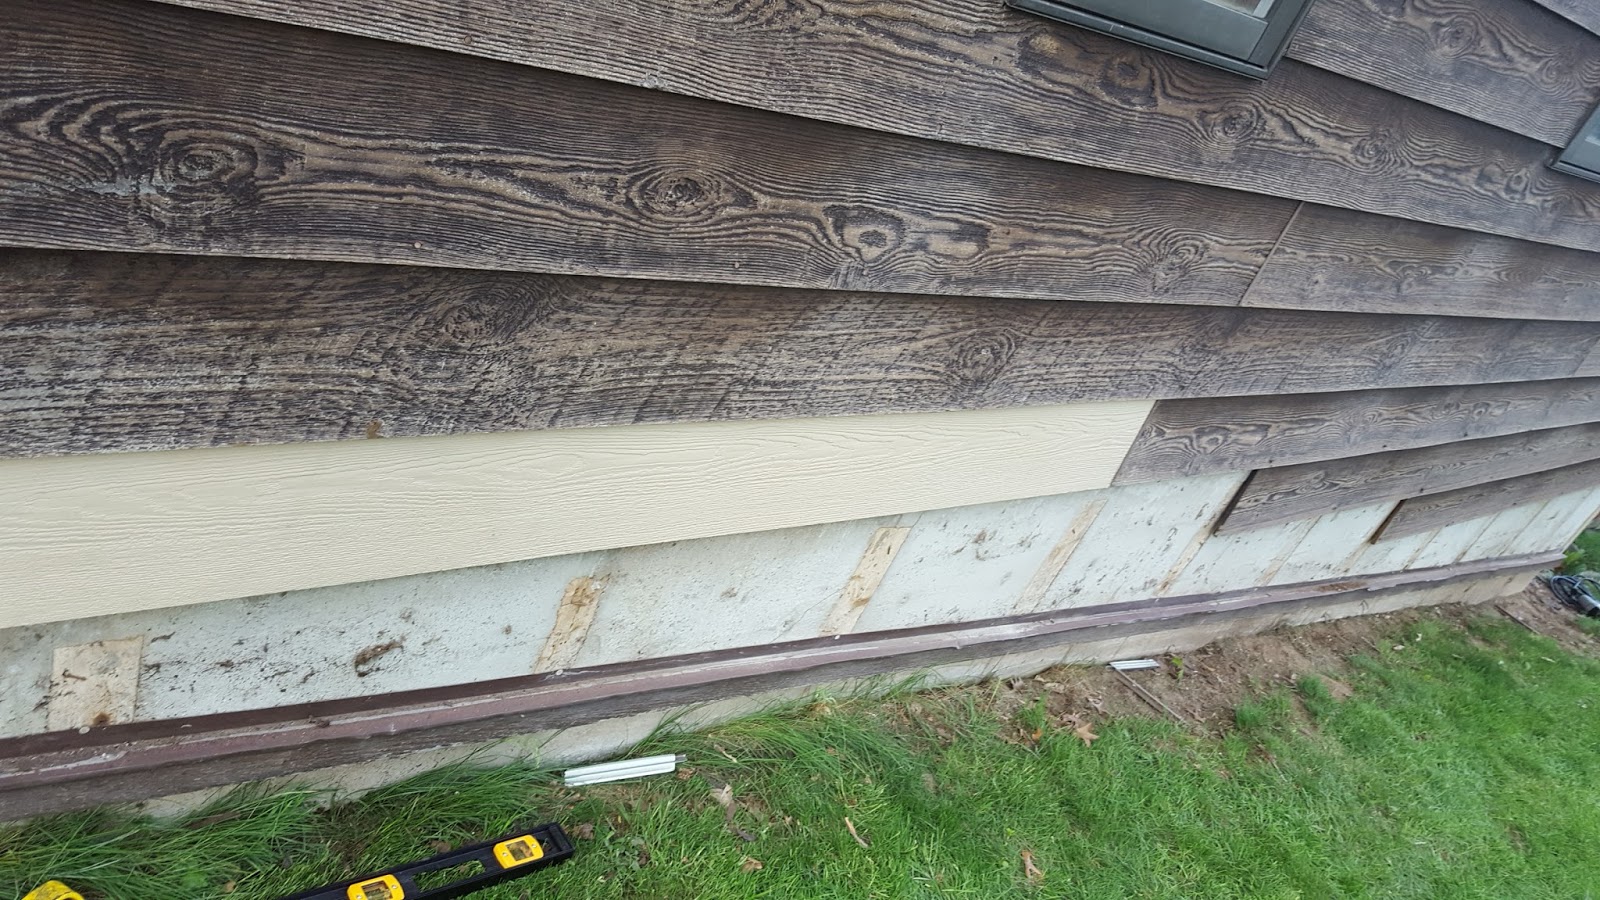
The side of our house (garage side) was in really ruff shape. It had really been tore up over the last 30 years and needed to be replaced. Ryan went around measuring what we needed to replace and off to Menard's we went. Forgot to mention before all of these steps the house was pressure washed. It took a while to locate a piece of wood that would work for us. Sadly they do not make wood in the size we needed anymore so Ryan had to choose boards that were larger and cut them down to size. Next we had to transport the 16 foot boards back to the house on our tiny trailer which I was surprised worked out okay with no deaths reported.


As you can see some of the boards were really really in crappy shape. Some of them almost became dust when removed. EEK.


 Here is Ryan cutting the wood to fit the spaces that needed replacing. The side of the garage had a ton of strange angles and was a bit challenging.
 Our first replacement board is up!
Ryan wanted all new boards on the bottom section since those seemed to rot the fastest.
We are almost done! Took a little over 2 hours to cut and place all the boards up. We were racing against day light to get them up. Not pictured Ryan also put up brand new end/corner pieces on the house as woodpeckers had went to town on them.

-----------------------------------------------------------------------------------------------------------------------------

Paint selection-
I want you to promise me that if you ever want to paint your house you get samples. GET all the samples. The bottom two colors pictured here were supposed to be the most delightful reds. They... well they were pink. I am not hating on pink it has it place in the world (workout clothes and baby's rooms for example). It for sure does not have a place on the side of my house though.


The bottom color I did not even put on the house. I opened it and starting laughing like a crazy person. NOPE to the nope on that color. The first two colors I put up were also pink as you can see in the top picture. Needless to say always buy samples because something may look great on the sample card and not be what you think nor want.

 Here are the contenders. I know in this picture they look the same but they have dried with the top being light and the bottom being a darker brown.
The colors in the running are "Red Farmhouse" and "Double Decker". We want to let them dry before we decide on one.

I will continue Volume two later this week with the joys of caulking the house and next weekend the start of actual painting. Stay turned for more house DIY.

Until next time~
XoXo Emily